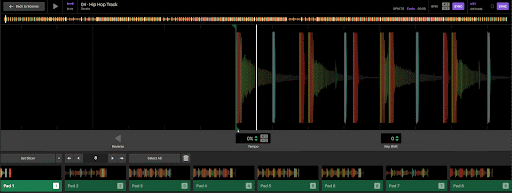
Here you'll find a visual representation of the source file, as a waveform with different colours that represent the frequencies most dominant, in that part of the audio. Red colours are used for sounds with low-frequency content and lighter colours are used for sounds with higher frequency content.
Main waveform: A large waveform that shows a snapshot of the source file audio, with the playhead in the centre. Clip-in and out points are illustrated by small coloured flags known as Cues. Click & drag on the waveform with your mouse to scrub through the audio and 'drag' the playhead through the loaded source file. Use the + or - buttons on your keyboard to zoom in and out of the waveform, or use the scroll wheel on your mouse.
Waveform overview: This smaller waveform shows the entire source file as an overview, and also shows the cue points and current position of the playhead. Click on a section of the waveform overview to move the main waveform snapshot directly to that position in the source file. Click & drag horizontally to scrub through the entire source file.

Playhead: The white vertical marker that appears directly in the centre of the Main waveform, which illustrates the current playback position, and moves through the waveform as the source file is played.
Cue: Cues are colored markers placed in the audio waveform, which assign playback positions for the Pads and any clips created from those Pads. You can trigger Cues by clicking on their corresponding Pads with your mouse, or alternatively by triggering MIDI notes or using your computer's keyboard. Cues can be made up of a start point, an endpoint, and the region between these two points which define the Pad, and any subsequent Clips.
Cue start: Near the top of each Cue is a small handle or flag that illustrates the start point of a Pad. Click & drag on the Cue start point, in the Main waveform, to move the Cue point to different parts of the source file.
Cue end: Near the bottom of each Cue is a small handle or flag, that illustrates the endpoint of a Pad. By default, Cue points will automatically place the Cue endpoint on the same position in the waveform as the Cue start - these Pads will play until the end of the source file when triggered. Click & drag on the Cue endpoint, in the Main waveform, to specify a place for the Pad to stop playing - this will also create a Pad region.
Cue region: The space between a Cue start point and Cue end point, which is illustrated by a shaded area matching the color of the Pad, and also indicates the length of a triggered Pad. The Cue region can be modified only when a Pad is first selected (pictured above).
Clip region: The space between a Cue start point and Cue end point, which is illustrated by muted, greyed out area outside of the Clip region, which is editable by first selecting an Audio Clip in the Audio Track timeline. This directly affects the selected Clip length or position (depending on whether the Cue start point or Cue end point is moved).
The Clip region can also be modified directly as explained in the Audio Track in the Song View section.
Beat Grid Mode: Click the ‘Grid’ button to enable Beat Grid Mode. Use this mode to make any corrections you wish to an audio samples beat grids for a more accurate reading. For more information about this mode, see the Overview: Editing Beat Grids section here.”