Serato Studio's audio output can be made available to other applications to assist in setting up Livestreams. This is done by routing the audio from Serato Studio to a virtual input device on your computer.
The following guide covers:
- Installing the Virtual Audio Device (VAD)
- Making Serato Studio's audio available for other applications
- Setting up OBS
- Going Live
Installing the Virtual Audio Device (VAD)
In order to set up live streaming with Serato Studio, you will first need to install a Virtual Audio Device (VAD) on your computer.
macOS
macOS users can use the Serato Virtual Audio device, which is bundled with Serato Studio 1.6.0 and above. macOS users on Serato Studio 1.5.8 and earlier will need to continue using iShowU, or upgrade to the latest Serato Studio release, which we strongly recommend.
Serato Virtual Audio (Serato Studio 1.6.0 or later)
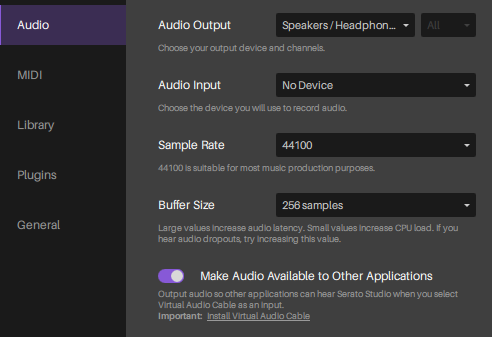
- After clicking Make Audio Output Available to Other Applications, under Setup > Audio, you will be prompted to install Serato Virtual Audio.
- Click Install, then follow the on-screen prompts, ensuring it's installed correctly.
- Ensure the Make Audio Output Available to Other Applications preference is now checked, then move to the How to set up Live Streaming (OBS) section further below.
NOTE: To uninstall the Serato Virtual Audio Device, please navigate to the bottom of this article for further instructions.
iShowU (Serato Studio 1.5.8 or earlier)
Please follow the steps on the developer's page below to install iShowU Audio Capture, the Virtual Audio Device supported with Serato Studio and your Mac.
NOTE: iShowU currently indicates it does not support macOS 11 Big Sur, even for users with Intel-based Apple computers. Please upgrade to the latest version of Serato Studio, to use the Serato Virtual Audio device, in this case.
Windows
Please follow the steps below to install Virtual Audio Cable LITE, the Virtual Audio Device supported with Serato Studio on your Windows computer.
- Download Virtual Audio Cable Lite setup from here: https://vac.muzychenko.net/en/download.htm
NOTE: Some customers report the latest version of VAC Lite works best, which at the time of this note, is version 4.66. - Right-click on the downloaded zip file in your downloads and select 'Extract here'
- Open the resulting folder and double click on 'Setup'
- Click 'Yes' when presented with 'Do you want to allow this app to make changes to your device?'
- Click 'Yes' on the 'Do you want to continue?' installation prompt
- Read the license agreement and click 'I accept'
- Click 'Install' to start the installation process
- Click 'Yes' if you wish to change the default audio device
- The installation process has completed, click 'Ok'
Enabling Serato Studio audio for other applications
Once the Virtual Audio Device has been installed you will need to enable the device from the Serato Studio Setup menu.
- Launch Serato Studio.
- Click on the Setup Cog on the right-hand side of the top toolbar
- Proceed to the Audio tab
- Enable the 'Make Audio Available to Other Applications' slider
Audio from Serato Studio will now be routed into Serato Virtual Audio (macOS), iShowU Audio Capture (macOS on Serato Studio 1.5.8 or older) or Virtual Audio Cable (Windows) and available in other applications as a selectable input.
How to set up Live Streaming (OBS)
Open Broadcaster Software (OBS) has proven to be a great option to use for live streaming. It’s free and easy to use provided your computer meets the minimum system requirements - https://obsproject.com/wiki/System-Requirements
NOTE: OBS has been used for the purpose of this guide. Other live broadcasting and streaming software can also be used.
Download OBS
- Download OBS free from here and install the application - obsproject.com
- Open Serato Studio. Connect any supported hardware you are using
- Open the OBS application
- On the initial launch, you will be presented with an Auto-configuration message. We cover the steps of the Auto-configuration in this guide - Optimizing Serato Studio and OBS for Live Streaming
Creating a ‘Scene’
- Click on the ‘+’ sign in the Scenes area in the bottom left of OBS.
- Label the Scene whatever you wish
Setting up your Audio Input
You’ll need to tell OBS what audio to capture from your computer. This can be done in the ‘Sources’ tab down the bottom of the application.
- Click the ‘+’ sign in the 'Sources' tab and select 'Audio Input Capture'
- Check ‘Create New’ to add a new device. Again, you can name this what you want.
- Choose the 'Device' you want to receive audio from. This will be the Serato Virtual Audio device, (macOS) iShowU (macOS with Studio 1.5.8 or earlier) or Virtual Audio Cable (Windows)
- Do a quick line check and make sure your audio is being received by OBS. You should see audio coming into the VU meter in the ‘Audio Mixer’ area of the software.
NOTE: In some circumstances, changing the sample rate of your session in Serato Studio after setting up your audio input in OBS, may result in a lack of audio in OBS.
To rectify this, simply remove the audio input you just created in steps 1-4 above, by clicking the '-' sign in the Sources tab next to the audio input, then re-add it starting from step 1 above.
Adding Visual Sources
For information on adding Live Camera and a GUI feeds to your stream, click here.
NOTE: Adding more sources to your Scene increasing the impact on the computer and could lead to performance issues.
Going Live
Firstly you will need to choose your streaming service. For this guide, we have chosen Twitch however you may choose whichever platform you wish.
Once you have created a Twitch account, you will need to acquire your streaming key. On Twitch, this is located under your Account Settings in the Channel and Videos Tab or alternatively, click here.
Setting up OBS with the Stream Key
- Open the OBS settings menu and click on the 'Stream' tab.
- Choose the service you chose from the 'Service' drop-down menu.
- Copy the Stream Key from your platform and paste it into the 'Stream Key' text box.
- Save this profile and label it so you can get going quickly the next time you want to live stream.
- Press ‘Start Streaming’ located in the bottom right corner of the application to go live to your selected platform and start playing your tracks.
Uninstalling the Serato Virtual Audio device (macOS only)
In some rare circumstances, you may wish to remove the Serato Virtual Audio device:
- Navigate to the installation path: macHD/Library/Audio/Plug-Ins/HAL
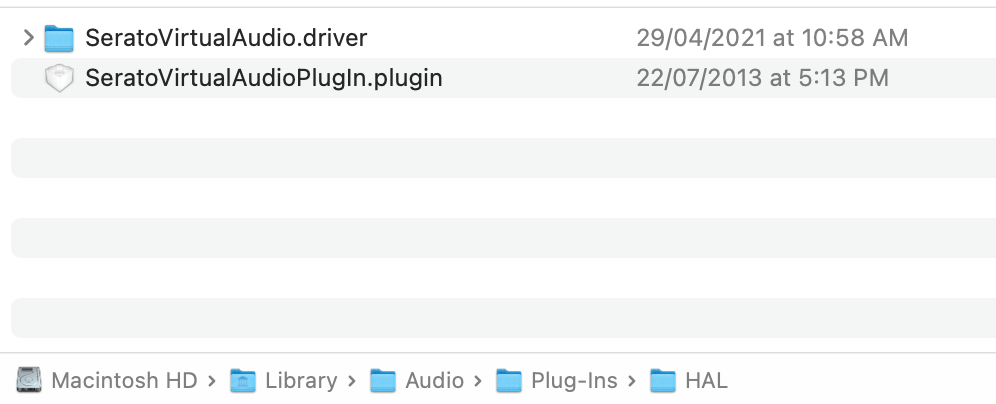
- Move SeratoVirtualAudio.driver and SeratoVirtualAudioPlugin.plugin to the trash, or simply delete them
- Restart your computer