Generally, you will need to make a few adjustments to your computer to ensure optimal performance for use with Serato Studio, or any Digital Audio Workstation for that matter.
It's strongly recommended to carry out the optimizations whether you have a very powerful Mac computer, or an older model.
Please check the Serato Studio system requirements for supported operating systems, and to ensure your computer meets or exceeds the recommended specifications that are stipulated.
Make sure you are also using the latest point release of your supported operating system version.
In order to complete many of the optimizations below, you will need to access System Preferences or System Settings (if using macOS Ventura):
macOS 13 Ventura
- Click the Apple logo at the top left corner of your desktop or new Finder window, and choose System Settings
or - Navigate to Mac HD > Applications > System Settings
macOS 12 Monterey or lower
- Click the Apple logo at the top left corner of your desktop or new Finder window, and choose System Preferences
or - Navigate to Mac HD > Applications > System Preferences
Power adapter
Ensure your computer's power adapter is connected. Using Serato Studio (or any CPU-intensive application) with battery power can result in CPU throttling which could cause performance issues, particularly when the battery capacity is nearly empty.
Restart your computer
You'd be surprised at how many random issues can occur because a computer has not been restarted in days, weeks, or even months in some cases. Audio drop-outs, distortion, hangs, freezes, and crashes can all be mitigated or avoided simply by regularly restarting your computer. We strongly advise you restart your computer before any session.
Audio settings
The Audio Buffer Size for Serato Studio can be adjusted in the Setup window. This setting determines how much time is available to the computer to complete all calculations for continuous audio playback, otherwise known as latency.
In computer based audio systems a certain amount of latency (known as buffering) is necessary to ensure that playback, recording and processing results in an error-free audio stream without dropouts or glitches.
The audio buffer size, measured in samples, refers to the 'slice' of audio that is processed by your sound card at any one point. At a setting of 256 samples, a chunk of audio 256 samples long is processed and sent through the sound card outputs, finally heard as an audio stream through speakers. The sound card will then fetch the next batch of 256 samples, and repeat the process, during continuous playback. Because this cycle is continuous, the processing 'workload' on the sound card will be greater when the buffer size is smaller. A larger buffer size on the other hand, will minimize this workload, but will also increase the amount of delay in time, or latency, while the audio signal is processing.
A recommended approach is to find a suitable setting by beginning at 128 samples, and doubling the value until you find a happy medium.
A higher sampling rate also reduces the amount of latency. As an example, imagine using a buffer size of 44 samples: with a sample rate of 44.1Khz (samples per second), the latency would then amount to 1 millisecond. If the sample rate is doubled, 44 samples will now correspond to half a millisecond latency, since there are twice as many samples per second. Please note that a higher sample rate will also exert more stress on the CPU.
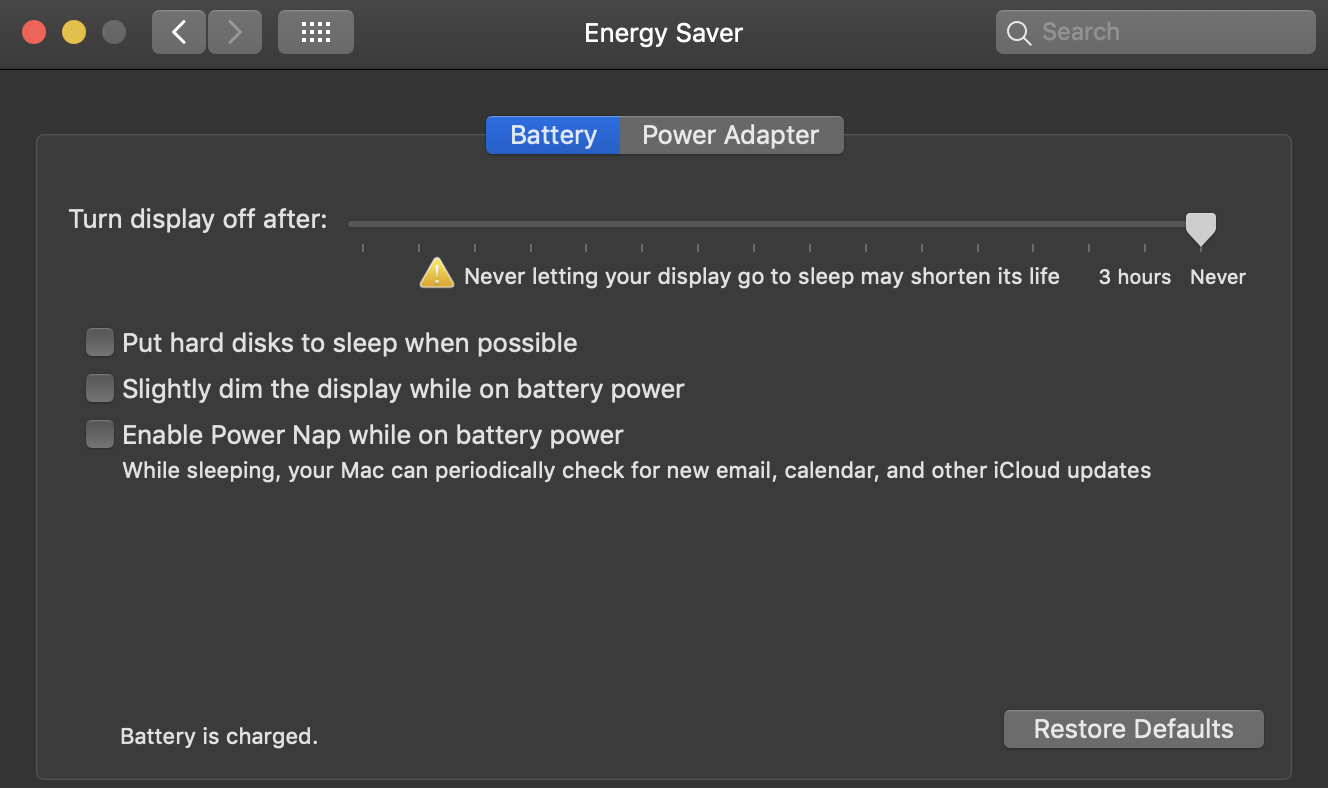
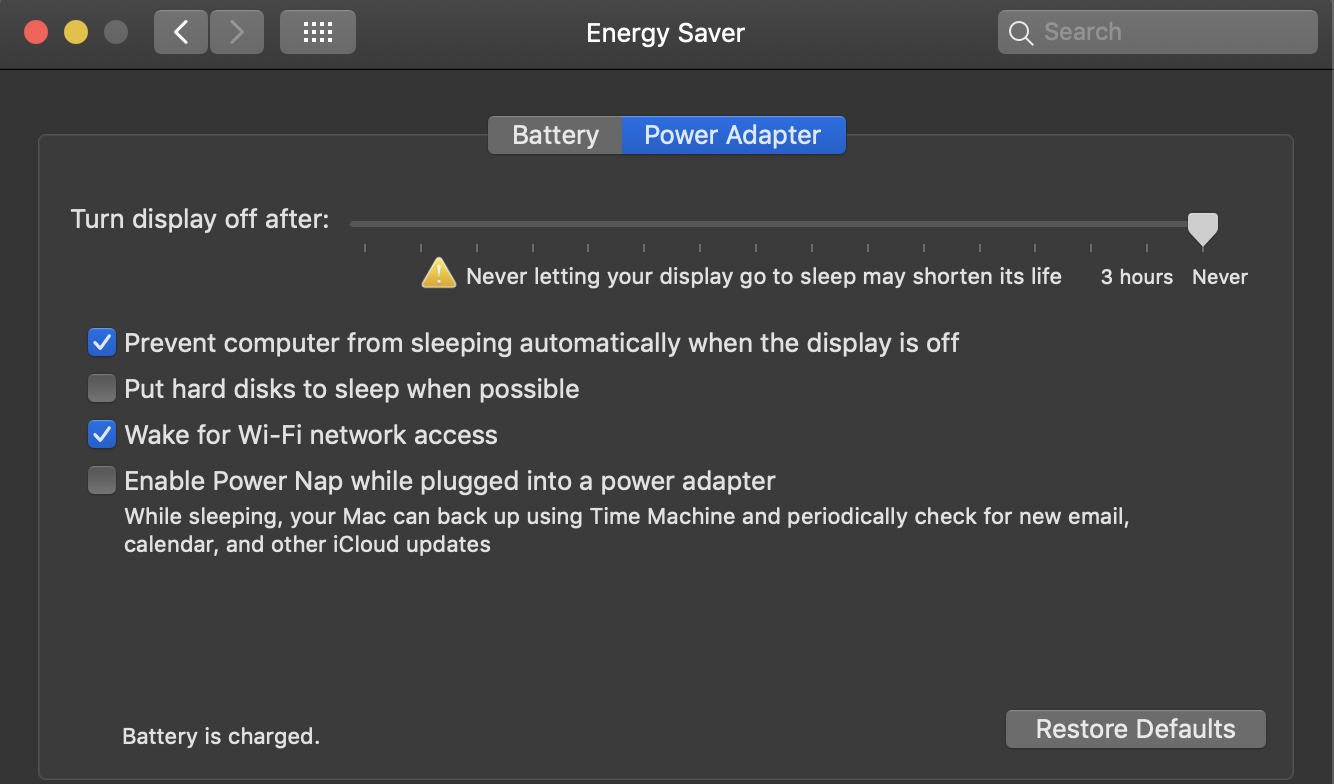
Optimize Power adapter & battery settings
This optimization will free up system resources as well as prevent the computer from going to sleep or standby mode which can cause audio dropouts with Serato Studio software.
- Open System Preferences
- Navigate to Battery
- Under BOTH the Battery and Power Adapter tab:
- If present, set the Turn display off after: slider, to Never
- Otherwise, check the box for Prevent computer from sleeping automatically when the display is off
- (If available) Uncheck the box for Put hard disks to sleep when possible
- (If available) Uncheck the box for Slightly dim display while on battery power
- (If available) Uncheck the box Enable Power Nap while on battery power
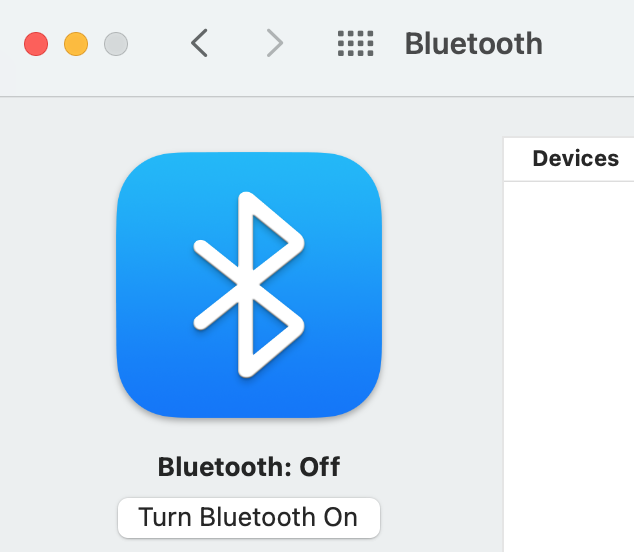
Turn Off Wi-Fi and Bluetooth
If your computer is equipped with Bluetooth wireless and/or a Wi-Fi (AirPort) card, these may need to be disabled for Serato Studio to work efficiently. In addition to freeing up system resources, disabling these can help resolve errors.
You can turn off Wi-Fi using these steps:
- Open System Preferences
- Navigate to Network
- On the left hand sidebar, click on Wi-Fi
- Click on the button that says Turn Wi-Fi Off

You can turn off Bluetooth using these steps:
- Open System Preferences
- Navigate to Bluetooth
- Click on the button that says Turn Bluetooth Off
Disable Automatic Updates
Some updates to your Mac software could cause conflicts with Serato Studio. Therefore it is suggested to disable the automatic update functionality within the operating system.
You can disable Automatic Updates using these steps:
- Open System Preferences
- Click Software Update

- Uncheck the box labeled Automatically keep my Mac up-to-date:
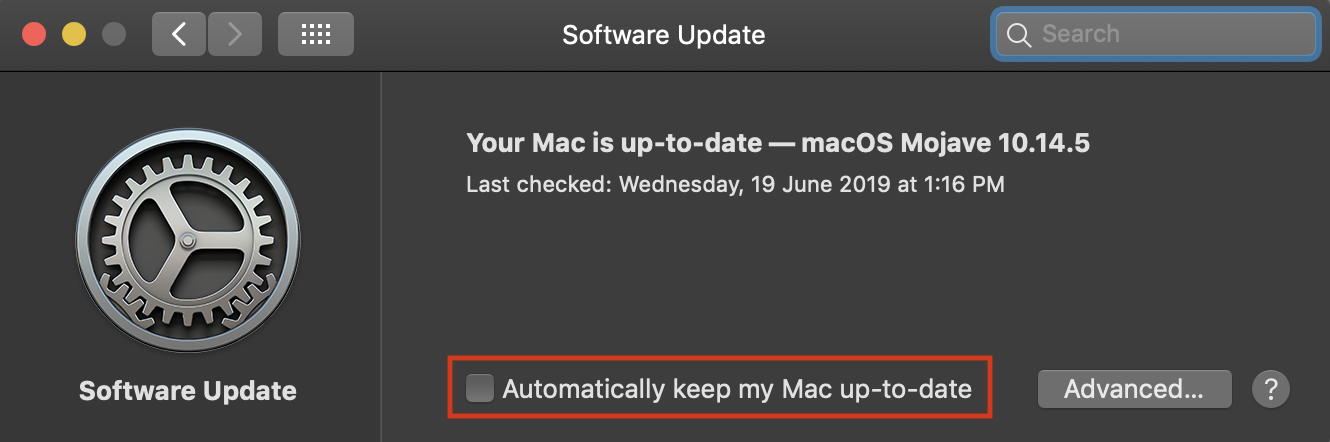 NOTE: If there is an update that you need, you can manually update your Mac software by clicking on the Apple menu in the upper left corner of your screen and select Software Update.
Disable Spotlight Indexing
Have you ever seen the Spotlight magnifying glass icon with a pulsating dot in the middle? Did you notice your Mac running super sluggish while this was occurring? This is Spotlight creating a virtual index of all the files and folders in your system (i.e., indexing), allowing Spotlight to quickly search your drives. For everyday use, this is fine and not too much of a nuisance, but when using resource intensive audio applications, having Spotlight suddenly start indexing in the middle of your set can be disastrous.
If your MacBook is overheating or the fan just won't stop buzzing, it's time to check the Activity Monitor. Because the systemstats process might be unnecessarily eating up your CPU processes.
The easiest way to prevent indexing is to adjust your Spotlight Privacy settings. The only hitch, Spotlight will no longer be able to search the drives you make ‘private.’ If you’re a Spoltight addict, don’t worry, you can easily remove your drives from the Privacy list to restore search-ability after your gig is over.
You can disable Spotlight Indexing using these steps:
- Open System Preferences
- Click on Spotlight
- Click on the Privacy tab
- Click the + sign in the bottom left corner, click on the drive you want to make ‘private,’ and then click Choose. Repeat the above process for each drive you wish to add to the Privacy list
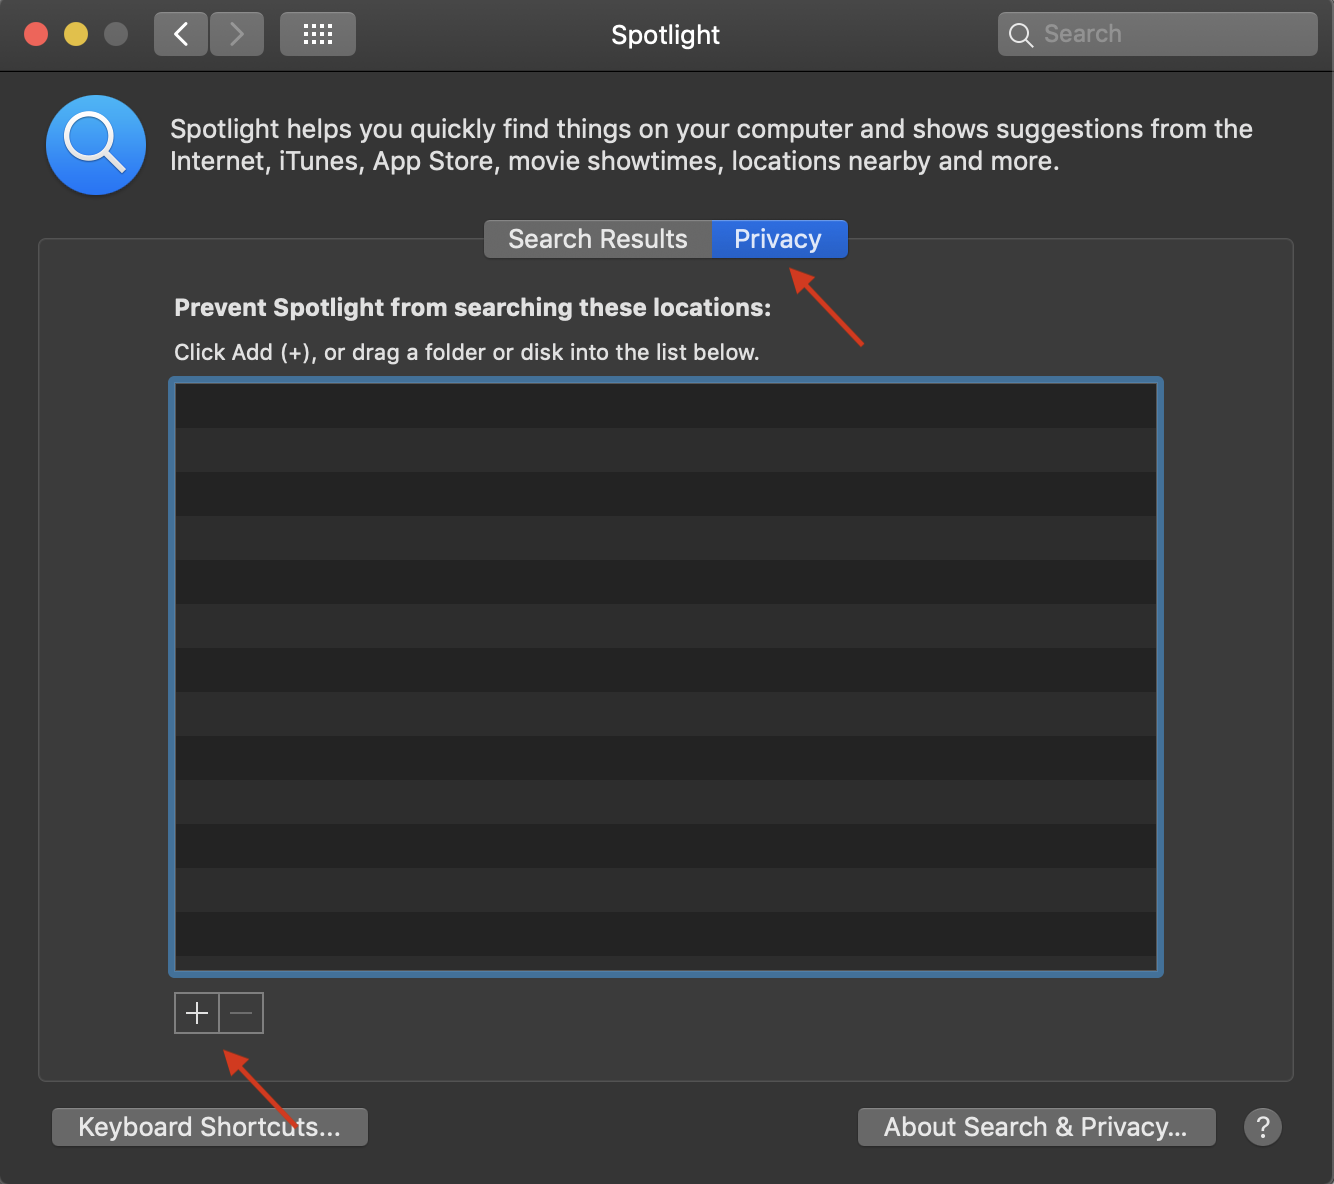
- To remove the drive, click on the drive icon listed and then click the – button
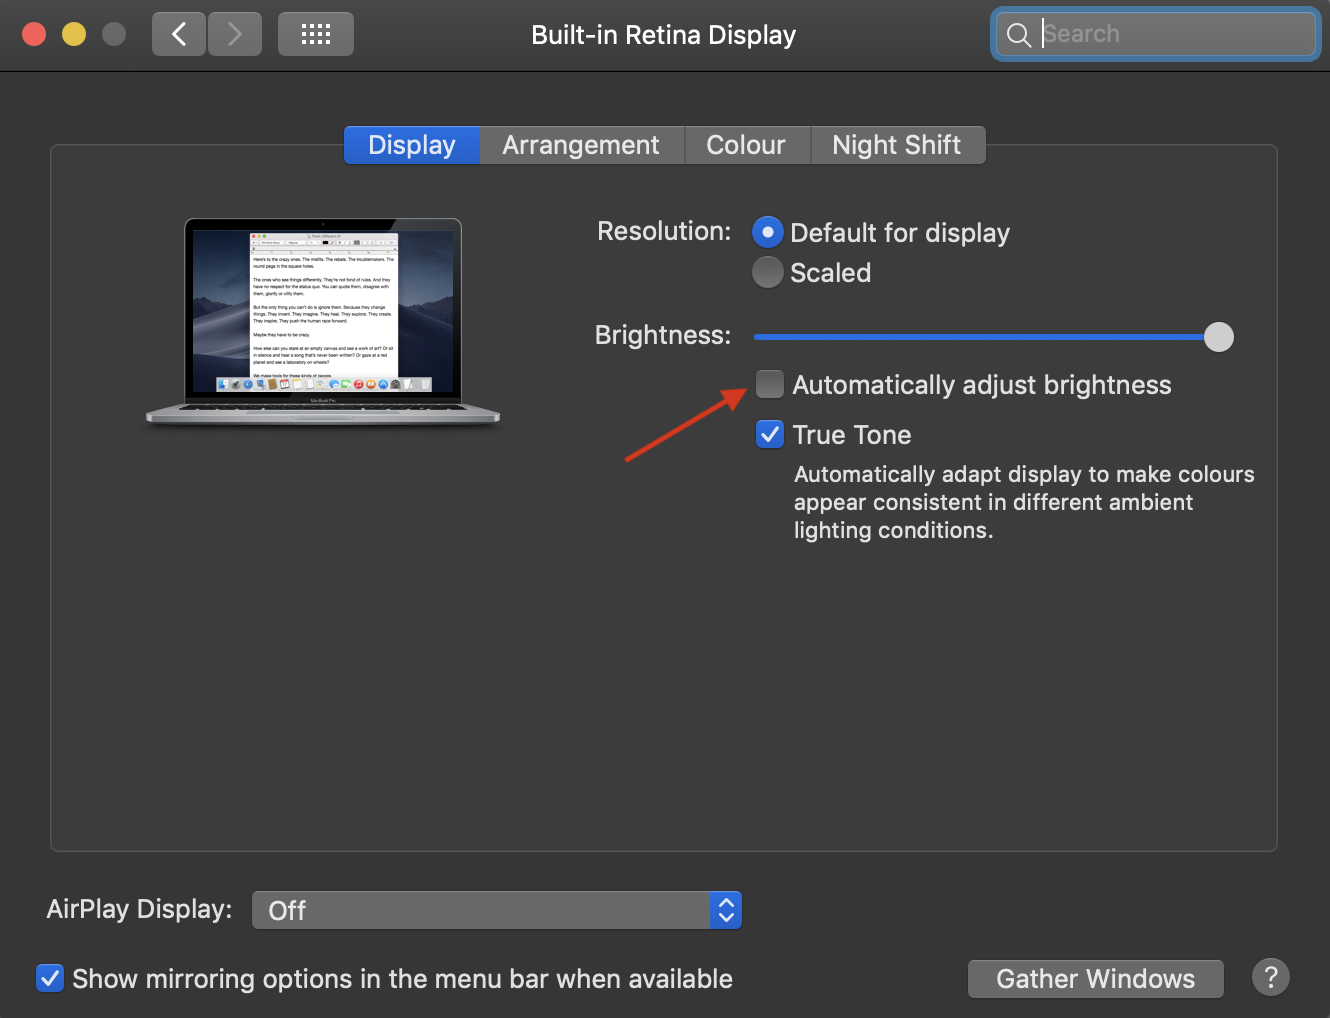
Disable Automatic Brightness
Disabling automatic brightness (if your Mac has an ambient light sensor), can improve waveform display related performance on some Mac's.
You can disable Automatic Brightness using these steps:
- Open System Preferences
- Choose Displays
- Select your Built-in Retina Display if you have multiple displays connected
- Make sure the box labeled Automatically adjust brightness is unchecked
Disable Sudden Motion Sensor (laptops with rotational hard disks only)
If you’re recording in a loud environment, this optimization will prevent the Sudden Motion Sensor from kicking in which temporarily stops the hard drive from spinning to prevent damage if your computer is suddenly moved.
NOTE: This feature only affects Mac computers with an older, rotational hard disk drive with spinning platters. It does not affect users who only use SSD's or flash memory in their configuration.
You can disable Sudden Motion Sensor using these steps:
To disable the Sudden Motion Sensor feature:
- Click on macHD
- Click on Applications > Utilities
- Open the Terminal app
- Type sudo pmset -a sms 0 and press Enter/Return on your keyboard
- Enter your mac user password when prompted, then press Enter/Return on your keyboard again
- Type sudo pmset -g to verify that this has been applied
To re-enable Sudden Motion Sensor feature:
- Follow steps 1-3 above, to open Terminal
- Type sudo pmset -a sms 1 and press Enter/Return on your keyboard
- Enter your mac user password when prompted, then press Enter/Return on your keyboard again
- Type sudo pmset -g to verify that this has been applied
Misc. optimizations
The following is a list of further recommendations to get better performance out of your system.
- Avoid connecting audio interfaces or controllers to USB hubs or adapters, where possible. You may have an overall better experience when you plug directly into your computer.
- Make sure all unnecessary foreground programs are closed, such as web browsers, instant messengers, or really any software other than Serato Studio. They can all tie up computer resources and begin seemingly random operations in the background which could cause intermittent issues.
- Turn off software that runs in the background, such as calendars, file locker / cloud storage, anti-virus / firewalls, and disk maintenance programs.
NOTE: We do not endorse disabling anti-virus or firewall software on a permanent basis. Only try disabling these utilities temporarily as part of a process of elimination, to see if they are causing performance based issues, then re-enable them, find another alternative software, or contact the software developer for more tips on trying to reduce their performance overhead on your computer.
If you are unsure about following this specific step, please consult an IT professional before proceeding, as it can leave your computer vulnerable to malicious software or attacks. - Disconnect any unused USB devices from your computer, including phones, tablets, USB storage devices, or devices you are charging.