The MIDI assign feature in Scratch Live is a great way to add flexibility and speed to your performances by mapping Scratch Live controls and functions to MIDI controllers. Having a MIDI controller at your fingers can add a whole new element to your live DJ set. Whatever Scratch Live feature or plug-in you gravitate towards, you will no doubt benefit from having it mapped to a MIDI controller.
In this introduction, we'll go through the basics of MIDI mapping by showing you how to map certain functions in Scratch Live.
Note : This could be any standard USB MIDI device.
ASSIGNING THE MIDI CONTROLS
To assign MIDI controls in Scratch Live you need to enter MIDI assign mode by clicking the MIDI button at the top of the display screen next to 'Setup':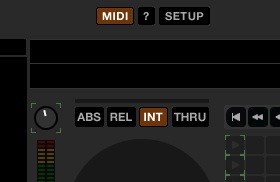
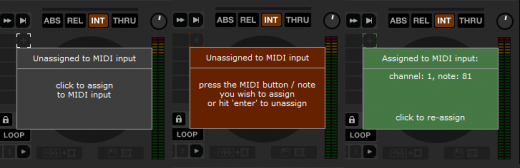
Once in MIDI assign mode it's very straightforward to assign the controls. Click the control on the Scratch Live GUI (display screen) then press/move/twist the desired MIDI control to map the two together. The brown box will turn green if successfully assigned to the MIDI control.
Some controls on Scratch Live can have a secondary function by using CTRL + Click when mapping. For example, holding CTRL and clicking on the loop button allows you to MIDI map the Loop Trigger instead of Loop Toggle.
NOTE: Dials and faders in Scratch Live will need to be assigned to either dials or faders on your MIDI controller. Assigning these to buttons will not work. The same goes for the opposite i.e. assigning a button in Scratch Live to a fader / dial on your MIDI controller.
When assigning the temp cue point and navigation controls since they're not normally on the GUI, a 'Show MIDI Panel' tab will pop up for you to assign these functions.

Please note : When you enter MIDI mode you will not be able to open or close tabs (except for the 'Show MIDI panel' mentioned above) so make sure you open up the tabs you need for assigning beforehand.
SAVING YOUR PRESET
To prevent the hassle of having to MIDI assign everything again the next time you have a gig go to the 'setup' menu and click 'MIDI'. Here you can create a new MIDI template file that will allow you to save and load your MIDI presets. Make sure you create a new preset BEFORE you start MIDI mapping so that when you are finished there will be a preset to save to - just clicking 'new' will wipe your current MIDI settings.